
Cancelling your subscription stops its renewal according to the terms shown during cancellation. Deleting account data is a separate, permanent privacy action. Choose the action that matches what you need.
Your goal: Stop the service or its next renewal
Use this action: Deactivate and cancel my account
Check before confirming: Effective date, remaining access and effects on billing shown on screen
Your goal: Permanently remove account data
Use this action: Delete Account and Data
Check before confirming: Data covered by the request, deletion timing and anything you still need to export
Cancellation is not a substitute for a data-deletion request, and deletion should not be used as a temporary way to stop service.
Cancellation stops future renewal at the effective date shown; it does not refund Subscription Fees already paid or unused time. The terms and conditions govern subscription refunds. Management may consider a discretionary request for an annual plan that renewed within the past seven days, but approval is not guaranteed. Contact Support promptly with the invoice details if that applies.
Before you start
You must use the top-level account, which is the main account with full administrative access. Before either action:
- Export any reports and invoices you must keep.
- Resolve tracker ownership transfers.
- Tell authorised users when they will lose access.
- Read every warning about effective dates, billing and deletion shown on screen.
Steps
Cancel the subscription
- Open Settings > Account.
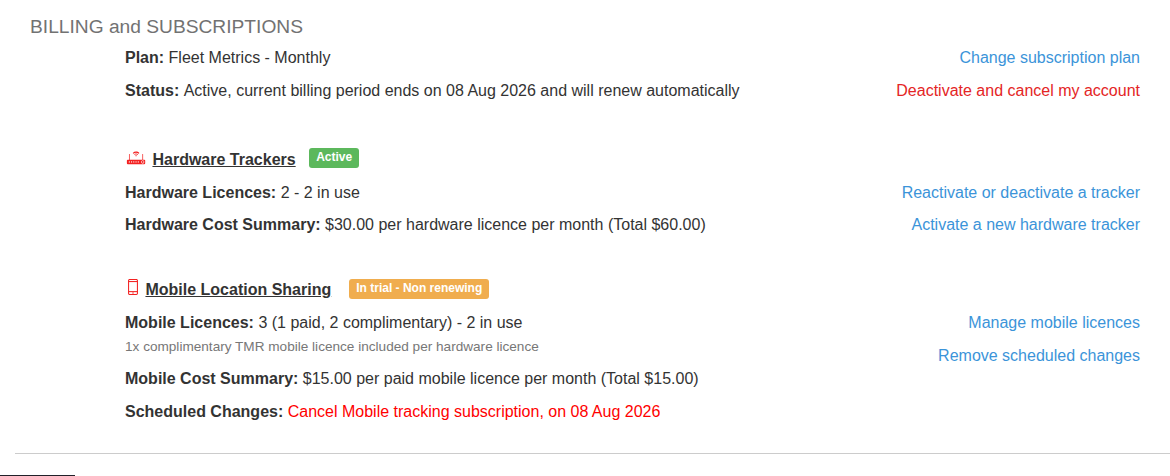
- Select Deactivate and cancel my account.
- Review the effective date and any remaining effects on billing.
- Complete the required security checks and confirm.
- Return to the Account page and verify that it shows the cancellation or scheduled status you expected.
Delete account data permanently
- Open Settings > Account and find EXTRAS.
- Select Delete Account and Data only if you intend to request permanent deletion.
- Read which data will be deleted and when the deletion will take effect.
- Complete the identity and confirmation prompts.
- Keep the confirmation or request reference without storing passwords, payment details or authentication codes with it.
What happens next
Cancellation and deletion follow the status and timing shown in their confirmations. After cancelling, check the Account page for the expected current or scheduled status. After requesting deletion, follow the confirmation instructions and avoid adding new data to an account you expect to be removed.
Troubleshooting
- The action is missing: Confirm that you are using the top-level account and viewing Settings > Account on the web application.
- A tracker still belongs to the account: Stop and complete any required ownership transfer before deletion. Do not share the account password with the new owner.
- The effective date or remaining charge is unclear: Do not confirm or repeat the request. Record the displayed status and contact Support for clarification.
- You need records after closure: Export the required reports and invoices before confirming. Do not assume deleted account data can be restored.
- The displayed status does not change: Refresh the Account page and check for a scheduled status or confirmation message before submitting another request.
- You expected a refund after cancelling: Cancellation and refunds are separate. Check the terms and contact Support with the invoice details. For a recently renewed annual plan, request management review within seven days of renewal; approval is discretionary.