
Use Location Sharing when a person has agreed to share their phone's position with Track My Ride. The Track My Ride app uses the phone's location permission and links reported positions to that person's record.
Before you start
You need a currently supported iOS or Android phone with the Track My Ride app installed and an available Mobile Location Sharing licence on the account.
Read Use GPS tracking responsibly with the person before linking their phone. Agree on the purpose, active hours, who can view the location and how the person can pause or stop sharing.
The person must consent before you link their phone. They must allow background location access, which lets the app report location when it is not open on screen. Explain who can see the location, why it is being collected and how the person can stop sharing under your organisation's privacy policy.
Choose how sharing should start before setup:
Automatic 24/7
Sharing should start automatically when the phone detects movement, unless the person pauses it or an administrator disables it.
Scheduled
Sharing should start automatically only during configured working periods. Check the person's timezone and allow for the phone to receive and apply the schedule.
The app can record points before uploading them as a batch. A setting that uploads fewer points per batch gives a more current map but can use more battery and mobile data; a larger batch reduces upload frequency but makes the live view less immediate.
Steps
Administrator setup
1. Enable and configure Location Sharing for the person
- Open People, find the person who will share their location and select Edit.
- Open the Location Sharing tab and set Location sharing to Enabled. If no licence is available, an account owner must adjust the Mobile Location Sharing licence quantity before setup can continue.
- Set the starting Odometer if the phone will represent a virtual vehicle, then choose its Path colour and the person's local Timezone.
- Under User account, choose the account the person should use in the app. This can give the person access to Location Sharing and other authorised account features.
- Under Vehicles, choose only the vehicles this person may select as their Driving Vehicle in the app. Choose No vehicles when their phone activity should not be assigned to a vehicle.
- Set Mode to Automatic 24/7 or Schedule.
- Choose the Sync point count. Lower values upload more frequently but can use more battery and mobile data; Every 200 points is the default.
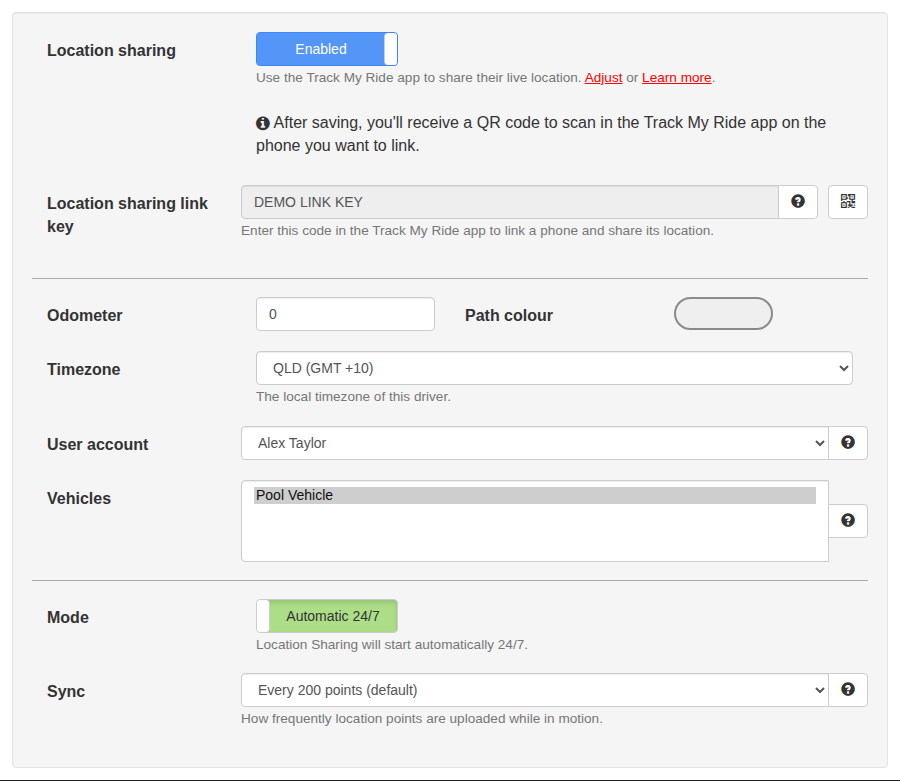
- Select Save. Enabling Location Sharing consumes one available licence and generates a link key for this person.
2. Configure scheduled sharing
Skip this section when Mode is Automatic 24/7.
- Set Mode to Schedule, then select Configure.
- Click or drag across the grid to mark active sharing hours in green. Each numbered hour covers that full hour; for example, hour 09 covers 9:00 am through 9:59 am.
- Check the person's timezone before relying on the schedule, then select Close and save the person.
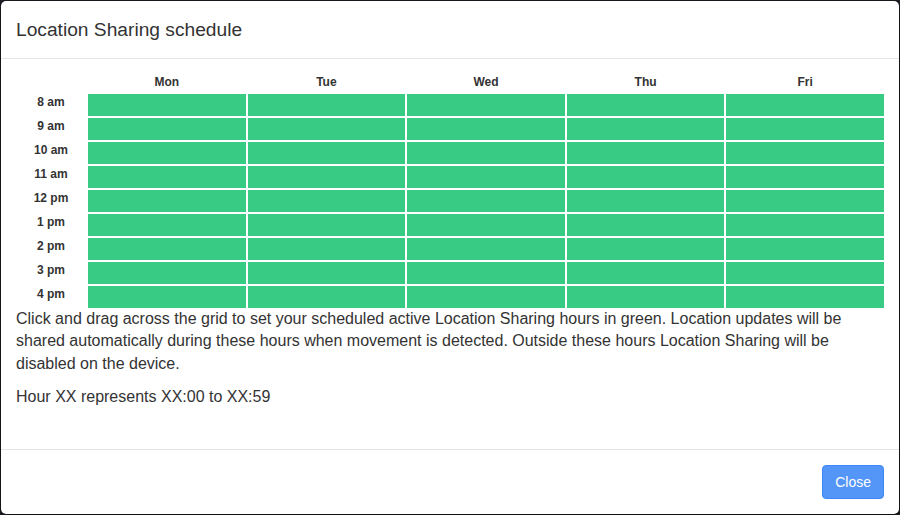
The schedule is controlled by the account manager. The phone user can see the schedule and can still pause or resume sharing for privacy, which overrides the scheduled state.
3. Send the person their private link
After saving, Track My Ride displays the phone-linking window.
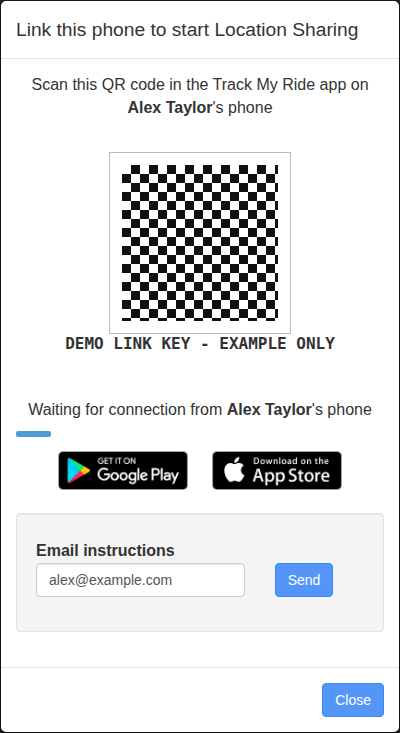
- Ask the person to scan the QR code with the Track My Ride app while it is on their phone, or enter their email address and select Send to provide the instructions.
- If scanning is not practical, give the person the displayed Location Sharing link key through an approved private channel. Treat the QR code and link key as private credentials for that person.
- Keep the window open until Successfully connected appears, or close it and return to the person's Location Sharing tab later to check the linked Phone name.
Do not reuse one person's QR code or link key for another person. If a key is exposed or sent to the wrong recipient, unlink the phone and generate a new link key or QR code before continuing.
End-user phone setup
1. Link the phone to the correct person
Install and open the Track My Ride app on the phone that will share its location. Use one of these setup methods:
- Administrator invitation: On the app sign-in screen, select Got a Location Sharing link key?, then scan the administrator's QR code or enter the supplied key.
- Signed-in self-setup: Sign in to the authorised account, open Location Sharing (App) and select Get Started.
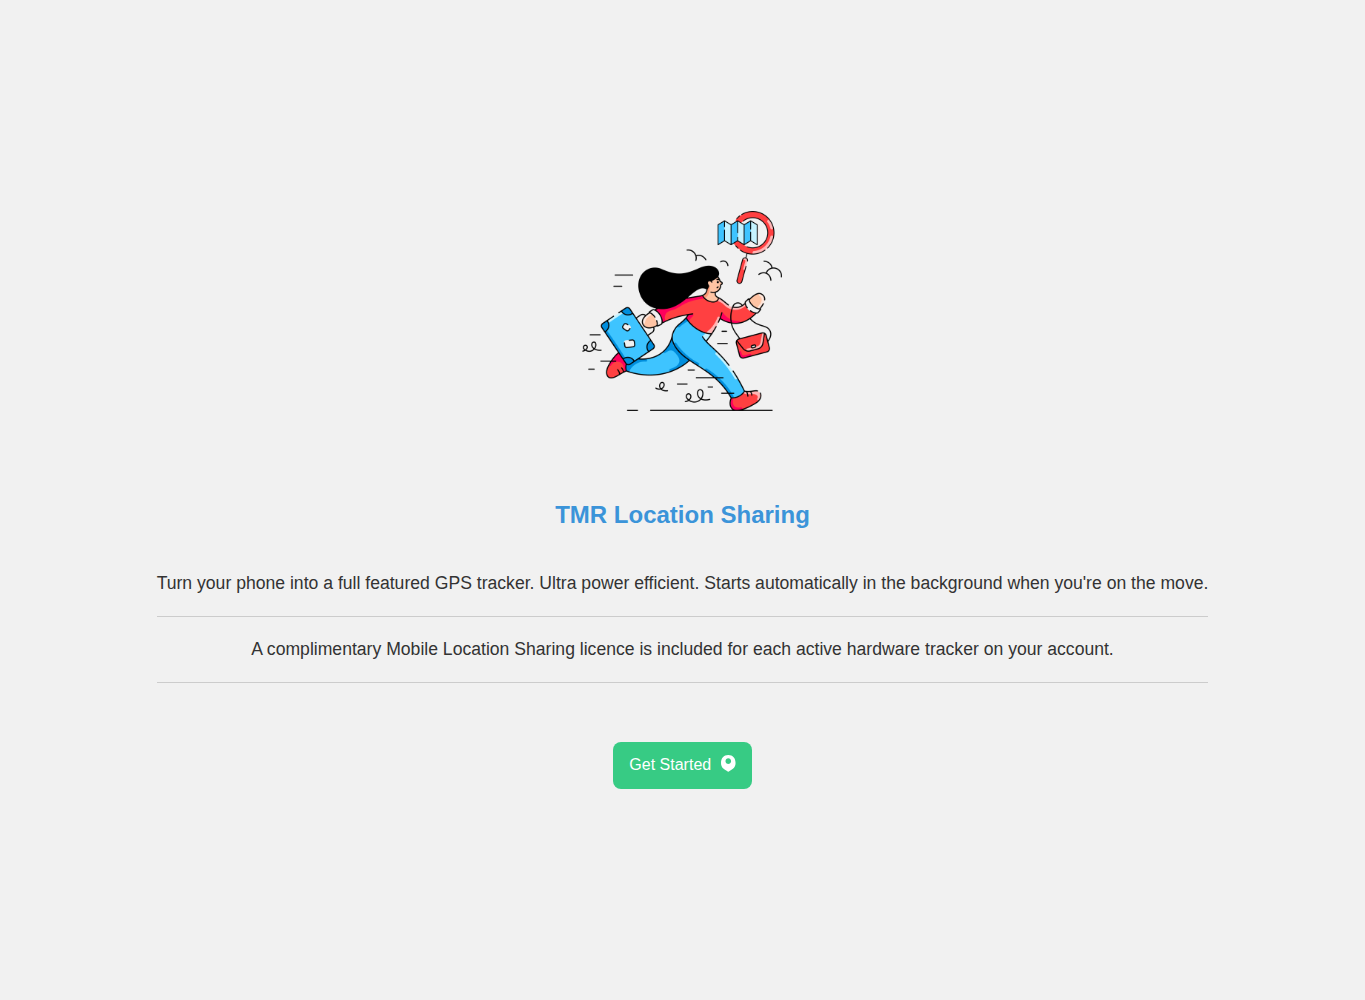
For signed-in self-setup, create a person or select the existing person who uses this phone, check the name carefully, then select Share location.
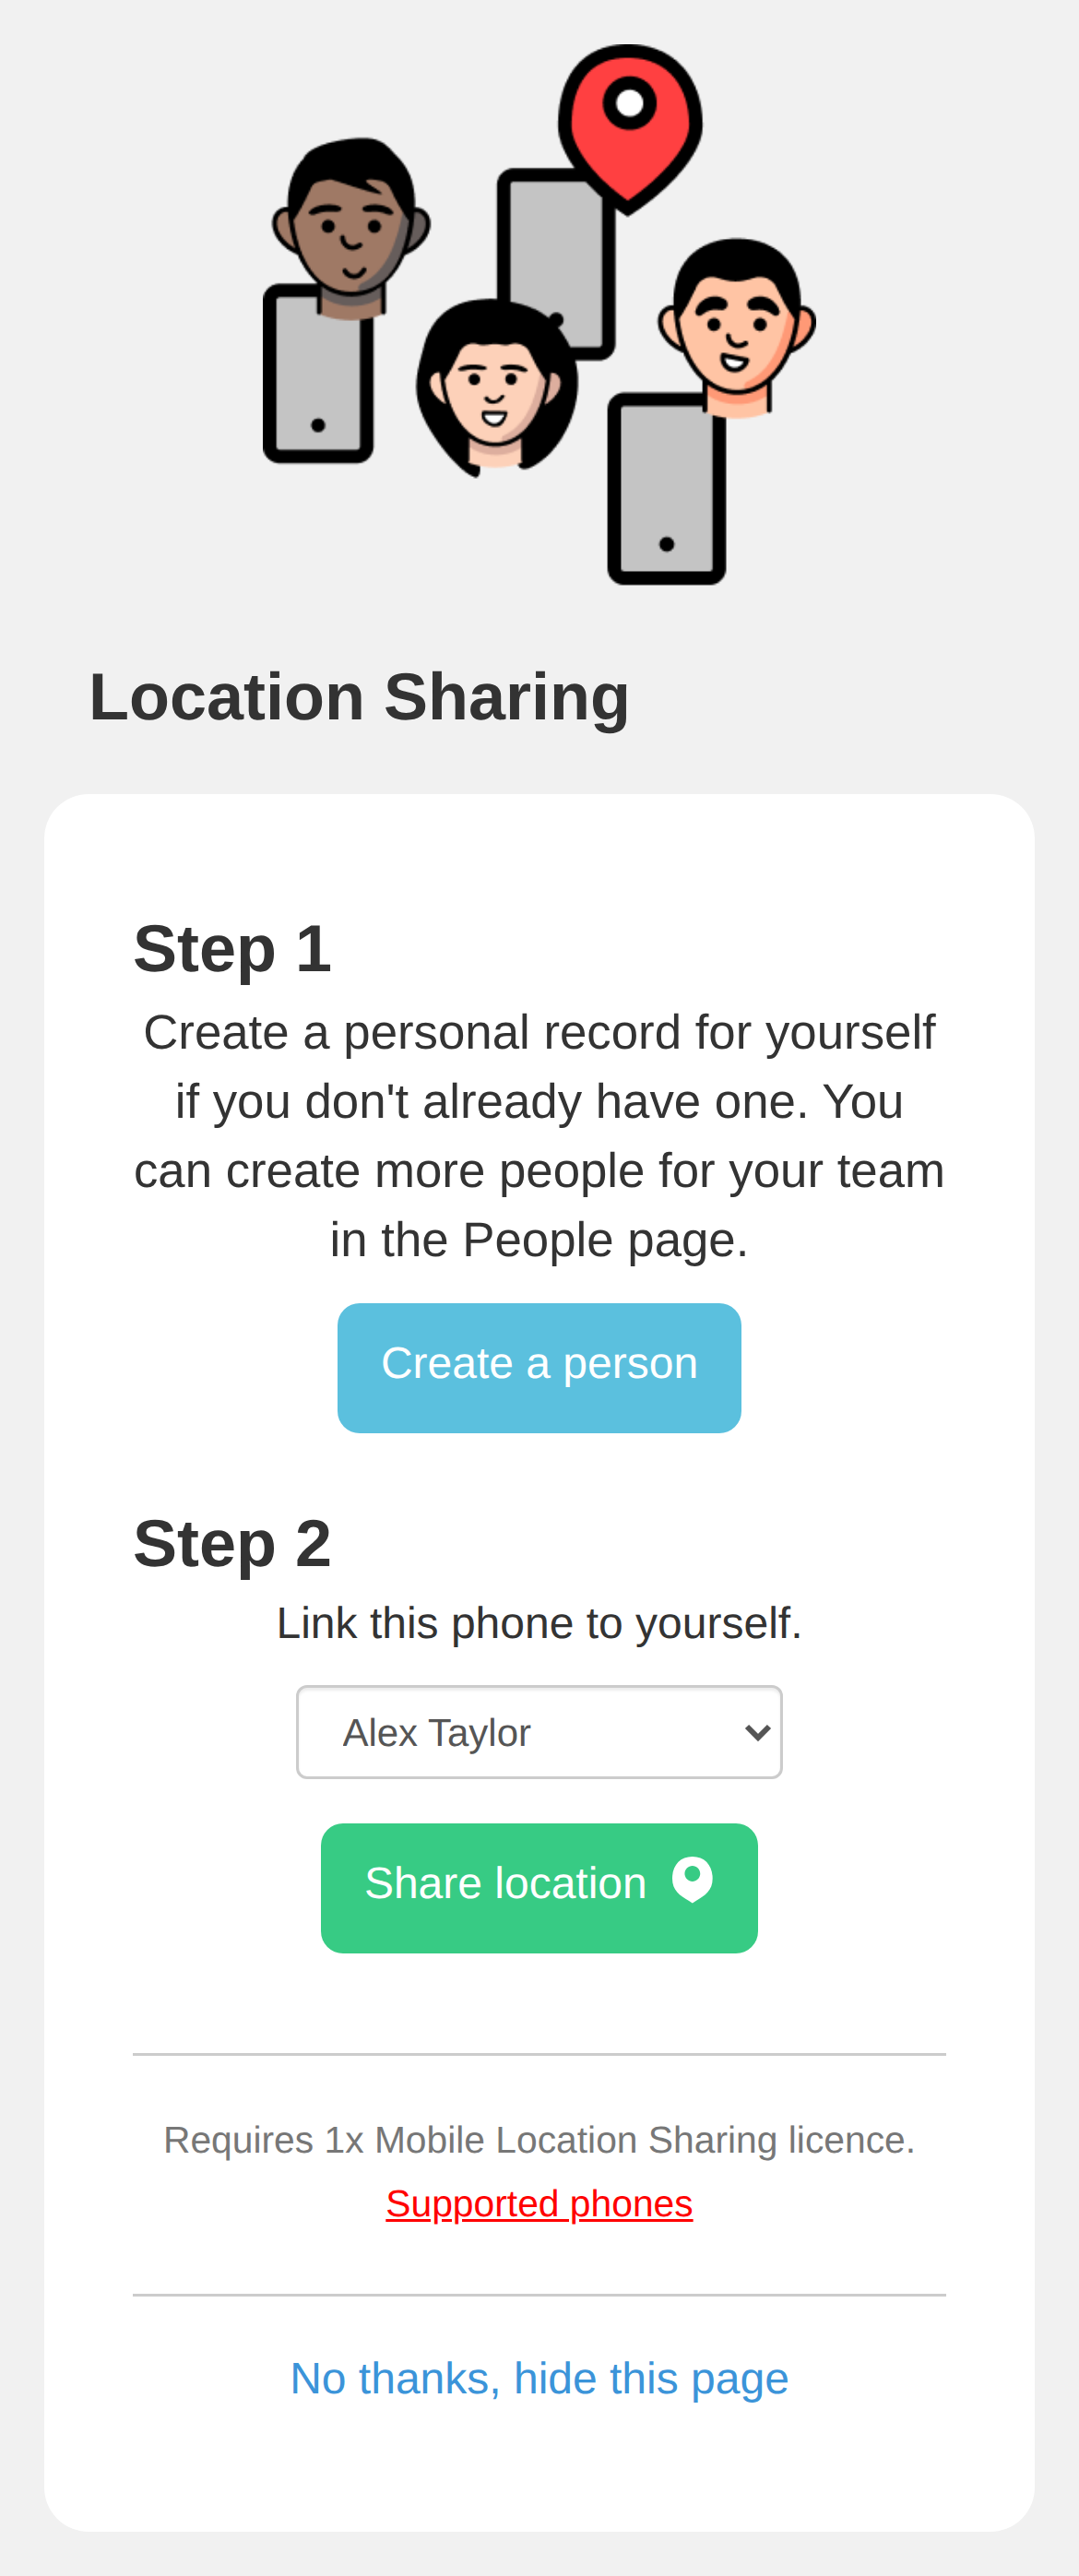
Stop and contact the account administrator if the correct person is absent. Selecting the wrong person attaches the phone's future positions to the wrong record.
2. Accept the privacy terms
Read the displayed Terms and Conditions and Privacy Policy. Select the agreement checkbox only after you understand and accept how the organisation will use the location data, then select Continue.
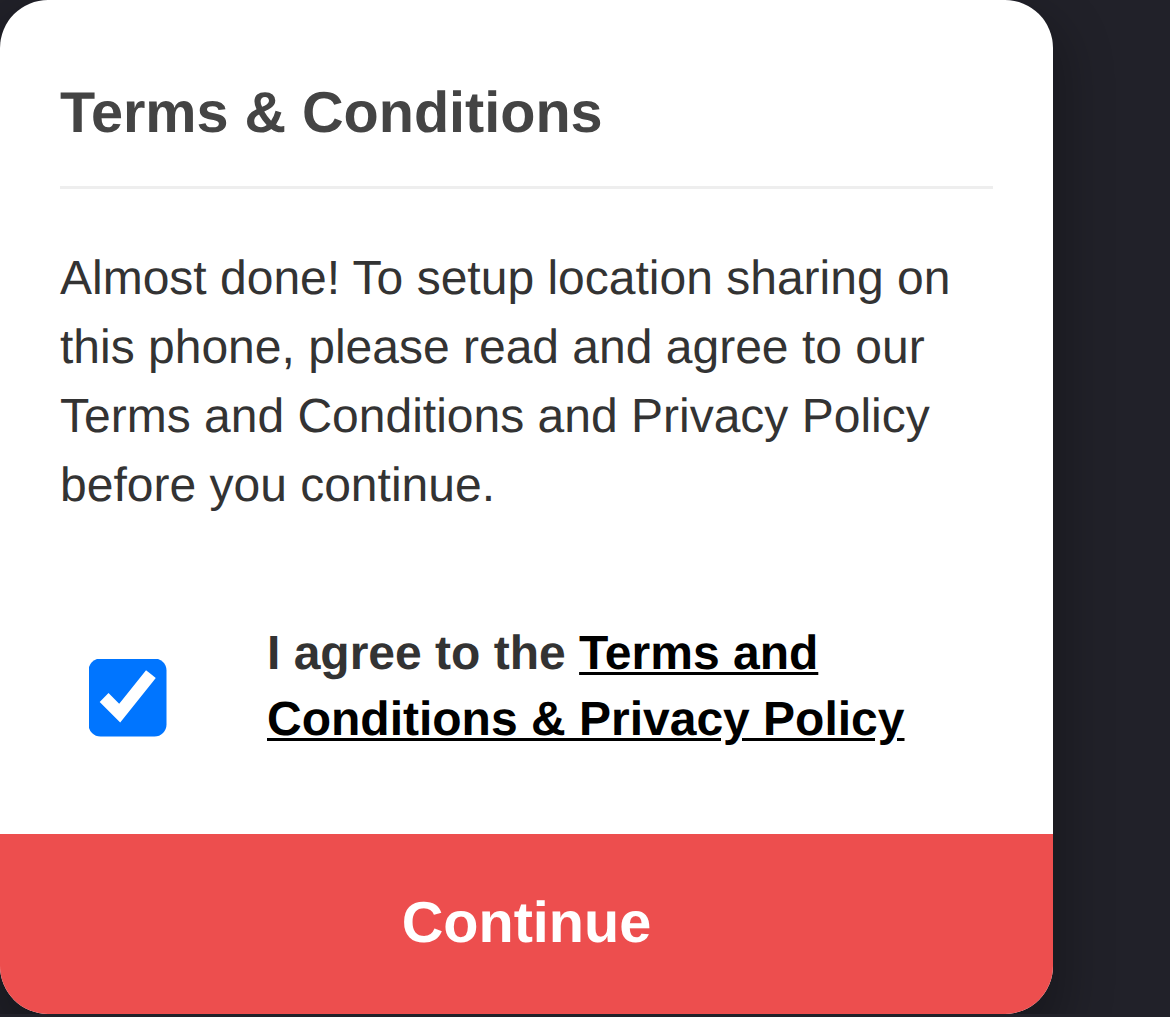
3. Allow the required phone permissions
Select Continue and respond to each operating-system prompt. Allow:
- notifications when required for linking, status and location requests;
- precise location while using the app;
- background or Always allow location so sharing can continue when the app is not visible;
- motion access so the app can reduce power use while stationary; and
- background refresh where the phone provides that setting.
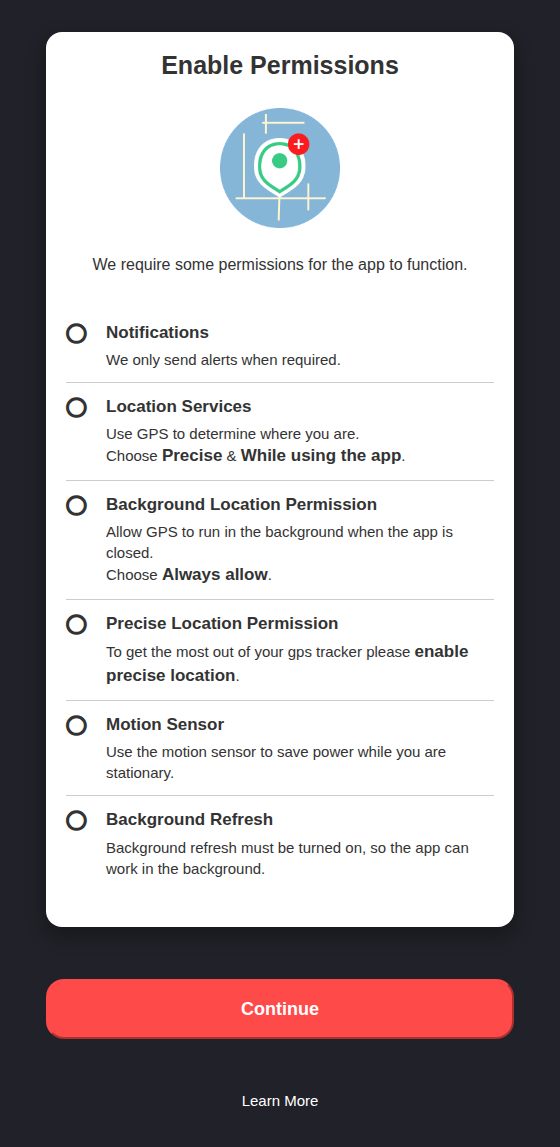
Keep low-power or battery-saver restrictions off for Track My Ride. The wording and order of permission prompts differ between iOS and Android; return to the app after changing a permission in phone settings.
4. Confirm the first location
- Turn Location Sharing on if it is not already active.
- Confirm that the screen shows the correct person and active status.
- Under Driving Vehicle, select the current vehicle when driving activity should be assigned to it.
- Ask the administrator to open Map and confirm that a recent position appears for the correct person. Scheduled sharing may wait until an active period begins and the phone receives its settings.
Use Location Sharing day to day
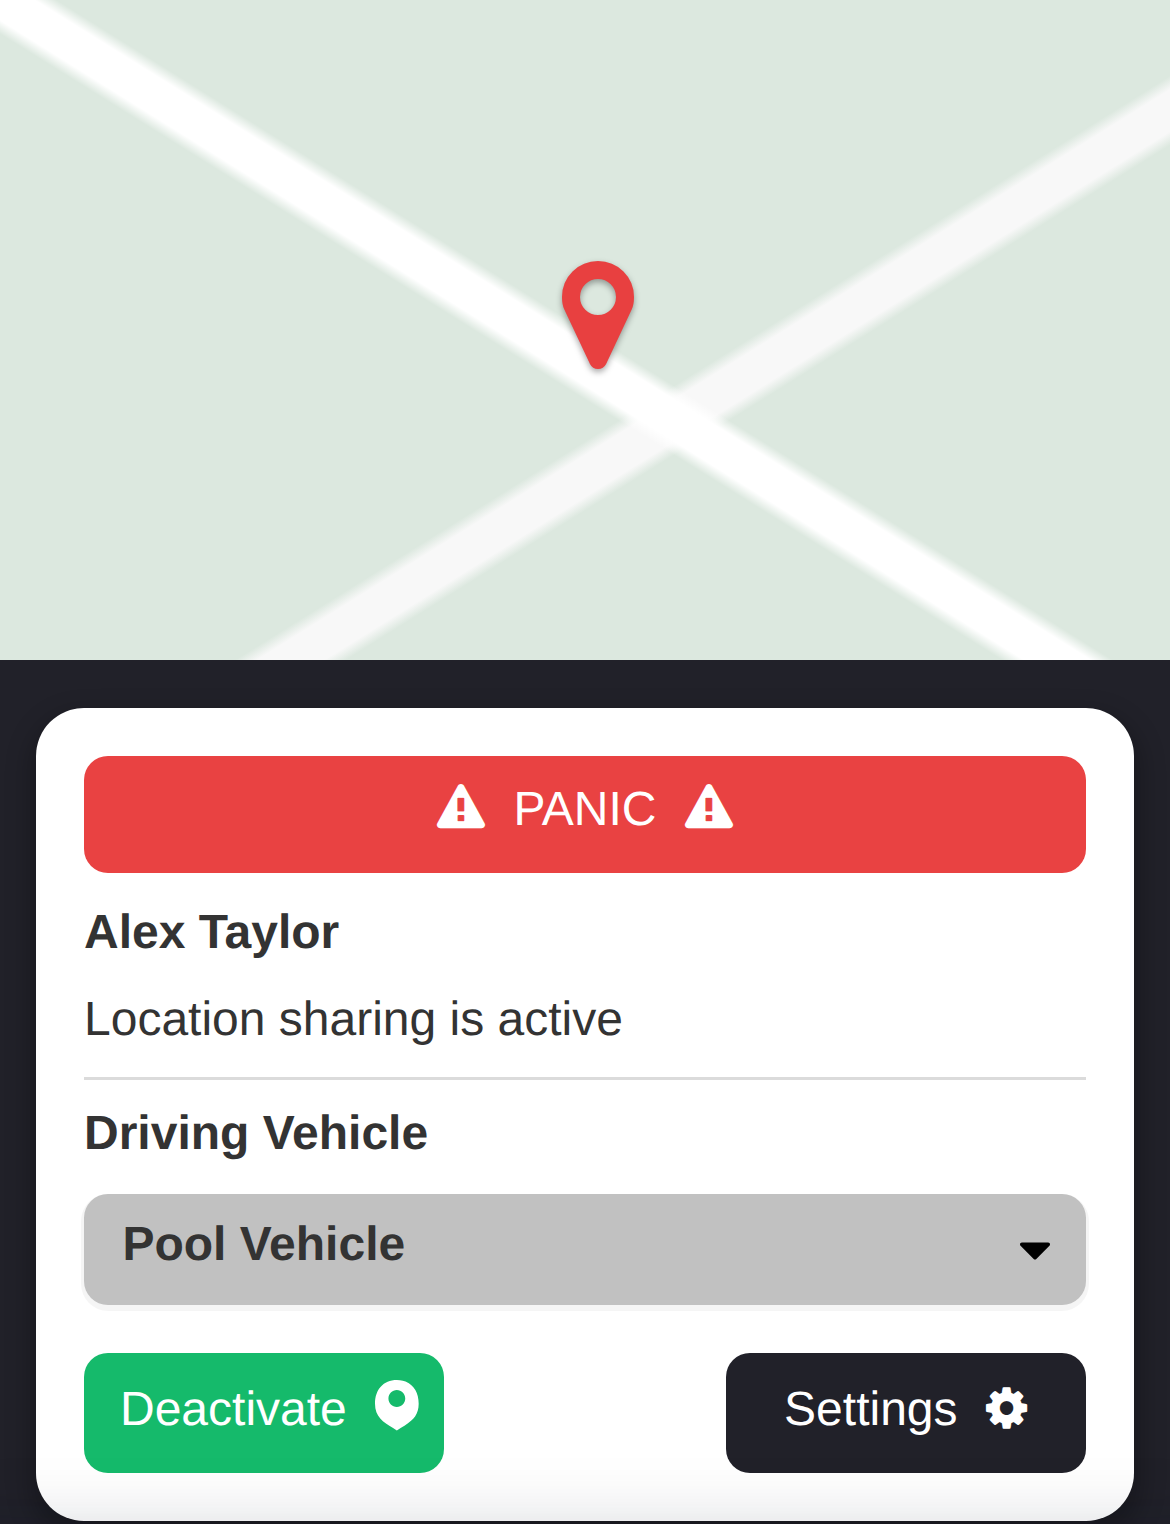
- On the active Location Sharing screen, check the person name and status before starting work.
- Under Driving Vehicle, select the vehicle currently being driven. Clear or change the selection when the person changes vehicles so driver and journey reporting is not assigned incorrectly.
- Use the green activation control to pause or resume sharing. A configured tracking schedule can also start or stop sharing automatically, but the person's manual privacy choice can override it.
- Open Settings to review Tracking, Tracking schedule and Screen always on.
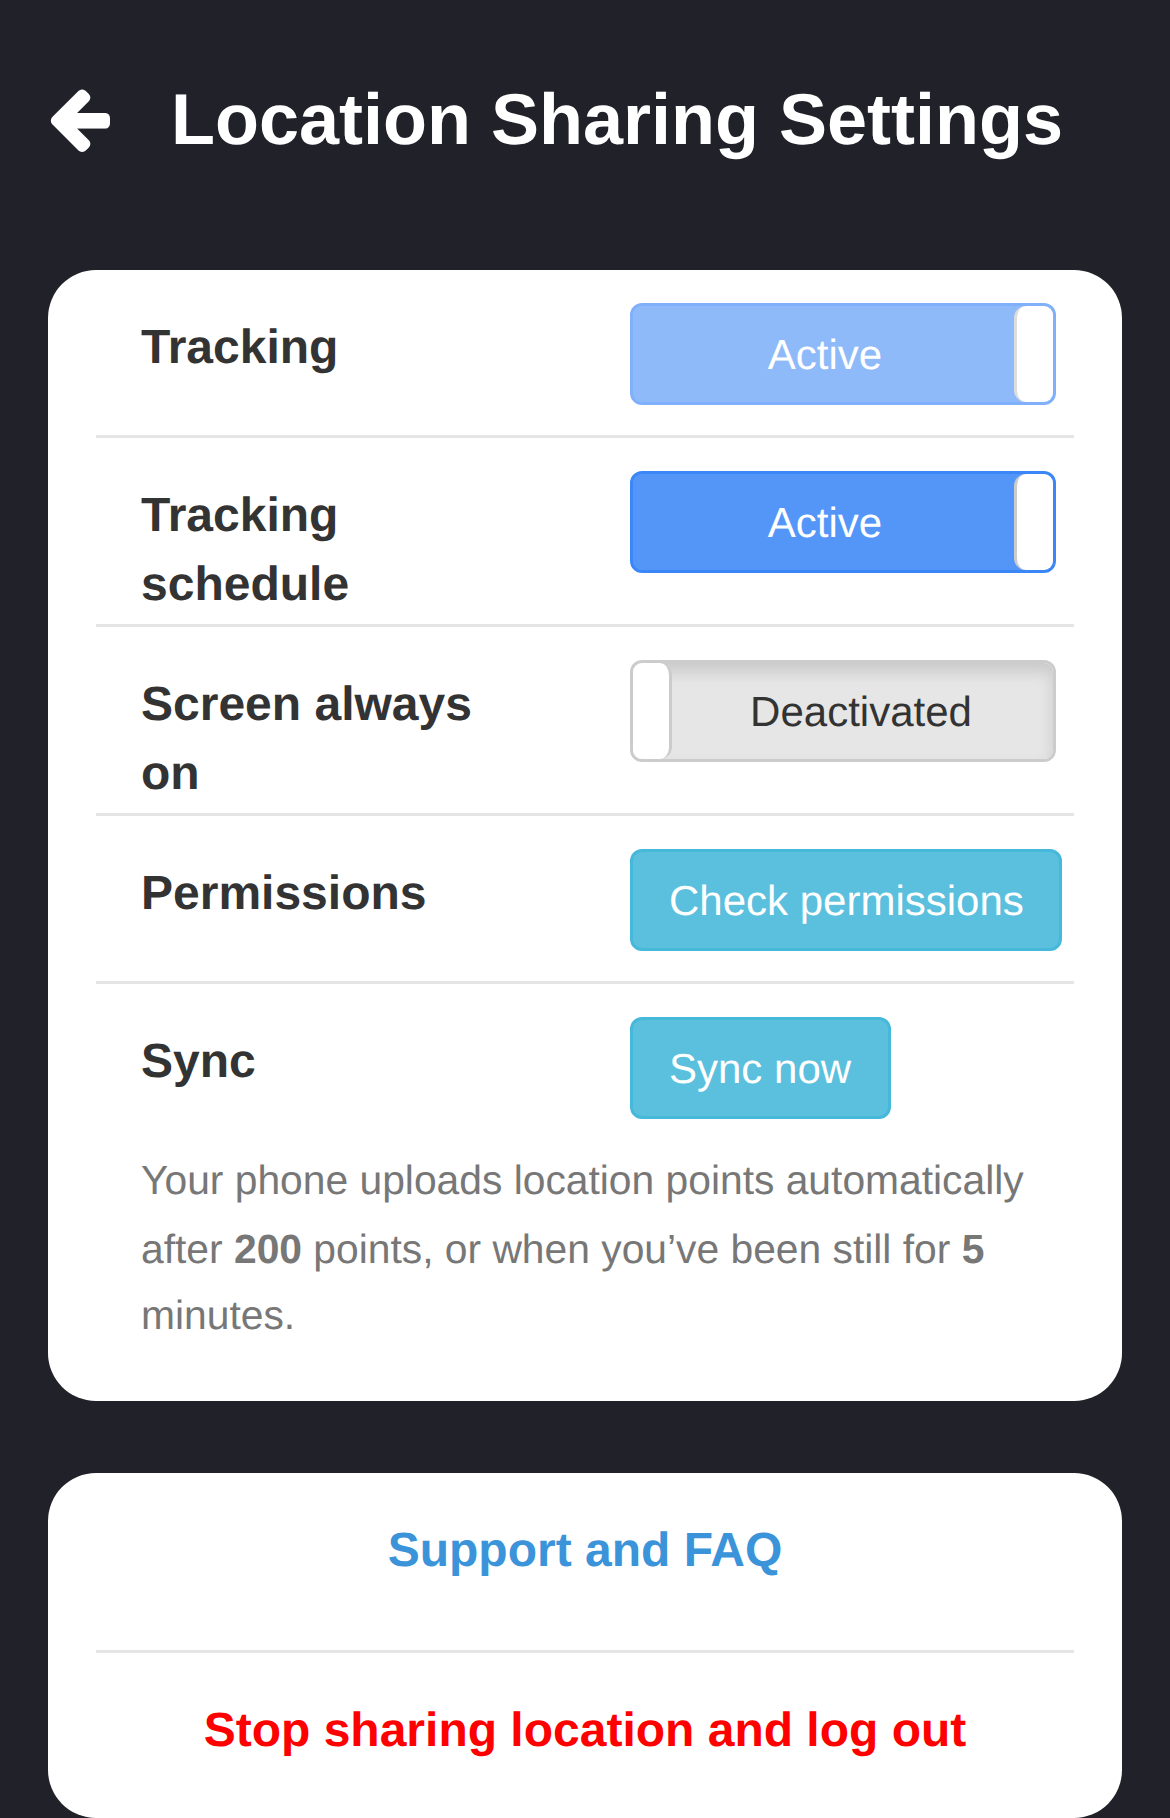
- Tracking shows whether sharing is currently active. Tracking schedule shows whether administrator-managed scheduled sharing is active; the phone user cannot edit the schedule grid here.
- Screen always on prevents the screen sleeping while this view is open and can increase battery use, so enable it only when needed.
- Select Check permissions when the app displays a permission warning. Restore each requested location, background, motion, notification or refresh permission in the phone settings, then return to the app.
- Select Sync now when recorded points have not uploaded and network access is available. Otherwise, the app uploads automatically after reaching the point count set by the administrator or after the phone has been stationary for the displayed period.
- Use Stop sharing location and log out only when this phone should no longer report for the signed-in user. Logging out is different from temporarily pausing sharing and requires an authorised user or a new link to set it up again.
The red PANIC control is for an emergency workflow configured by your organisation. It is not a test or location-refresh button. Follow your organisation's safety procedure when using it.
Link a replacement phone
- As an administrator, open People, edit the person and open Location Sharing.
- Check the displayed Phone name, then select Unlink. Confirm the warning only after checking the person; unlinking applies immediately and stops new data until another phone is linked.
- Open the QR/link handoff and link the replacement phone to the same person using the new link key or QR code.
- Grant the required permissions, then confirm the replacement phone name and a recent location before returning or disposing of the old phone.
Request a current location as an administrator
- Open People, edit the person and open Location Sharing.
- Confirm the linked phone and mobile status, then select Request current location now.
- Wait up to the period stated in the confirmation, then check Map. Delivery depends on the phone being powered on, online, able to receive push notifications and within scheduled hours. Rate limits can temporarily prevent repeated requests.
A ping does not silently override the phone user's paused state, disabled notifications or an inactive schedule.
Deactivate Location Sharing
To stop the current phone but retain the person's Location Sharing configuration, select Unlink. To disable the service for the person, set Location sharing to Disabled, confirm the immediate deactivation warning and save. Disabling or unlinking stops new positions; it does not by itself reduce the account's purchased licence quantity or erase previously authorised history.
What happens next
While sharing is on and its schedule permits it, the linked person can appear on Map, My Journeys and supported reports. New positions depend on the phone having power, the required permissions and network access. Turning sharing off stops new location reports; previously authorised history remains subject to your organisation's access and retention rules.
Troubleshooting
- If no position appears, confirm that sharing is on and that the phone is linked to the correct person.
- Check background location permission, battery optimisation and mobile data. Phone settings that restrict background activity can prevent new positions.
- If the position is old, check whether scheduled mode is currently active, restore network access and reopen the app before checking Map again.
- If points remain on the phone, select Sync now after restoring network access and wait for the upload to complete.
- If the wrong driver appears in reports, confirm the Driving Vehicle selection and correct it before the next journey.
- If a permission warning returns, use Check permissions and review battery-saving restrictions as well as location access.
- If a replacement phone does not report, confirm the old phone was unlinked and the new phone is linked to the same person before creating another record.
- Relink the phone only after confirming that the existing link is inactive, to avoid linking the wrong record.