
Driver ID identifies the person using a vehicle by reading an assigned RFID card or electronic keyfob. When a compatible reader and tracker receive a recognised credential, Track My Ride associates that person with the vehicle so their name can appear in live vehicle details, journeys, reports and relevant alerts.
The credential does not track the person by itself. The installed vehicle reader detects it and sends the identifier through the vehicle's hardware tracker.
Before you start
Confirm that each required vehicle has a compatible Driver ID reader connected to a supported hardware tracker. Reader installation and tracker configuration may require a professional installer.
Create one People record for each driver. Assign each physical card or keyfob to only one person, and do not reuse an identifier from a lost credential until your organisation has confirmed it cannot be used.
Driver ID accepts either:
- A keyfob ID containing exactly 12 or 16 hexadecimal characters. Hexadecimal uses the digits
0to9and lettersAtoF. - The complete number printed on a supported RFID card, including its site code and card number, for example
0010341785 157,52633.
Driver ID is the credential value. It is different from the person's internal unique_id used by CSV imports and integrations.
Steps
Assign a card or keyfob
- Open People, find the intended person and select Edit.
- Enter the complete keyfob ID or printed RFID card number in Driver ID.
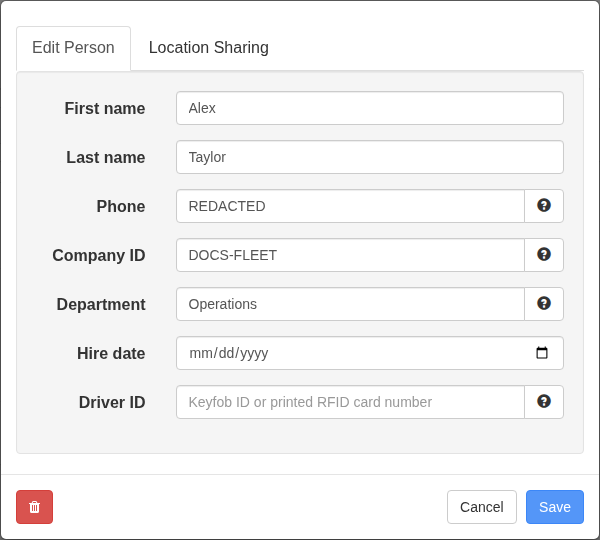
- Select Save, reopen the person and confirm that the displayed value matches the physical credential.
- Repeat for other drivers, using a different credential for each person.
Test automatic vehicle association
- Choose a vehicle with a compatible reader and ensure its tracker is online.
- Present the assigned card or keyfob to the reader. Wait for the reader's normal acknowledgement and a new tracker update.
- Open Vehicles or Map and confirm that the vehicle shows the expected driver.
- Start a short, safe test journey, then stop the vehicle and allow the tracker to report the completed activity.
- Finish the test using the logout method configured for that vehicle. The account may log the driver out automatically, require another supported action or retain the driver until another person logs in.
You can also assign the current driver manually from the relevant vehicle. Manual assignment is useful when a reader is unavailable, but it does not test the card, keyfob, reader or tracker configuration.
Confirm reports and alerts
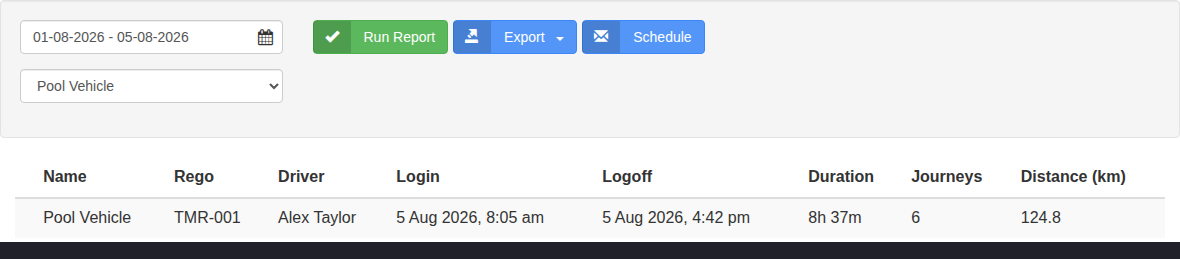
- Open Reports > Driver History, select a period containing the test and run the report.
- Confirm that the person, vehicle, login time and driving period match the test.
- Run the relevant Journeys or Journey Summary report and check the driver shown for activity after the login event.
- Open Reports > Alert History after a relevant vehicle alert and check the driver information recorded with the event.
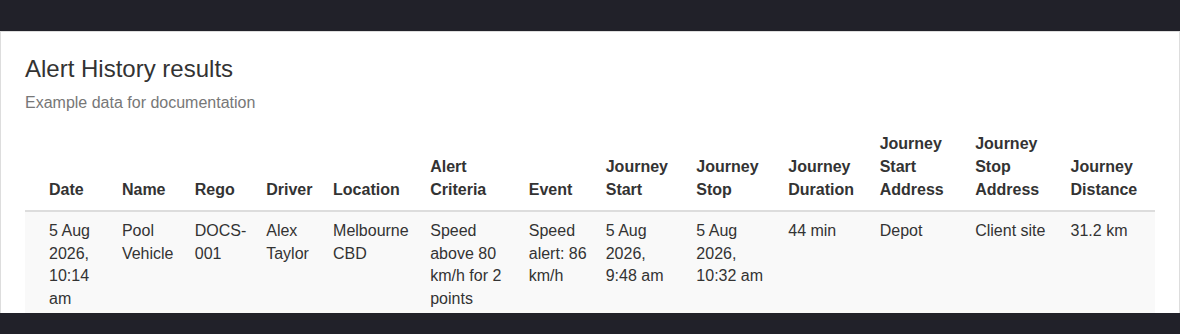
Reports preserve the driver association recorded at the time of the activity. Changing a person's current vehicle later does not rewrite historical journeys or alert events.
What happens next
A recognised credential logs the assigned person into the reporting context for that vehicle. New journeys and relevant vehicle events can then carry the person's identity until the system records a logout, another driver logs in or an administrator changes the current assignment.
Driver History is the clearest place to audit login periods. Journey reports show who was associated with completed travel, while Alert History can show the driver linked to the vehicle when an alert event was recorded. Rosters and reservations select the same People records but do not prove that a particular credential was presented to a reader.
Troubleshooting
- The Driver ID is rejected: Enter all 12 or 16 keyfob characters, or the complete printed RFID card number with matching site and card values. Check commonly confused characters such as
0andO. - The reader reacts but the driver does not change: Confirm that the credential is saved against the intended active person, the vehicle tracker is online and the reader is connected to that tracker.
- An unassigned keyfob alert appears: Note the identifier from the event, identify the physical credential, then assign it to the correct person. Do not guess who used it.
- The wrong person is shown: Search People for a duplicate credential, remove it from the incorrect record and retest the intended person's credential.
- The driver remains assigned after leaving the vehicle: Review the tracker or application setting for automatic driver logoff, or use the supported logout action for the installed reader.
- Driver History is empty: Widen the report period, include the correct vehicle and person, and confirm that the reader login reached Track My Ride rather than relying only on a local reader beep.
- A journey or alert shows no driver: Check whether the person logged in before the event and whether the tracker sent the login update. Assigning a driver after an event does not normally change that historical record.