
The GeoBeetle Wired (Model TMR-R3) is a compact tracker with fixed red and black leads. It connects directly to a compatible vehicle battery or power supply. Follow the voltage and environmental limits in the supplied quick-start guide. Do not submerge or pressure wash the enclosure.
Technical specifications
Dimensions
92.5 mm long x 57.5 mm wide x 16 mm high
Weight
63 g
Ingress protection
IP65 dust-tight and water-resistant; do not submerge or pressure wash
Supplied leads
430 mm red positive and black negative leads with 8 mm ring terminals
Input power
10-30 V DC with overvoltage protection
Internal battery
170 mAh, 3.7 V lithium-ion
Fuse protection
Internal 3 A fuse
Current at 12 V
Less than 2.8 mA in ultra-deep sleep; less than 4.54 mA in deep sleep (default); less than 36.7 mA nominal with no load; less than 250 mA maximum at full load or peak
Mobile network
LTE Cat 1 FDD bands B1, B3, B5, B7, B8 and B28
SIM
Embedded triple-network SIM using Telstra, Optus and Vodafone; no user SIM required
Satellite systems
Dual-band L1 and L5 receiver supporting GPS, GLONASS and Galileo with 75 L1 and 60 L5 channels
Position accuracy
Less than 1.5 m CEP at -165 dBm
Time to first fix
Less than 1 second hot; less than 24 seconds warm; less than 35 seconds cold
Sensors
Voltage monitoring and 3-axis accelerometer for motion detection
The IP65 rating protects against dust and water jets under rated test conditions. It does not make the tracker suitable for immersion, pressure washing, damaged seals or an installation where water can collect around the enclosure or leads.
Before you start
Before installing this tracker in a vehicle or equipment used by someone else, read Use GPS tracking responsibly. Confirm ownership or written permission, tell affected people about the tracking and obtain the required consent before continuing.
Keep the quick-start guide available while checking the supplied leads and planning the installation:
Download the GeoBeetle Wired Quick Start Guide (PDF)
Read the entire procedure and the vehicle manufacturer's battery instructions. The supplied ring terminals (the metal rings at the ends of the leads) fit compatible 8 mm battery-clamp fasteners. Do not force them onto a different terminal.
For a hybrid or electric vehicle, connect the tracker only to a compatible low-voltage 12 V auxiliary battery. Never connect or probe the traction battery, orange high-voltage cables or propulsion electronics. Check the vehicle manual and use a qualified hybrid/EV technician if the auxiliary battery or its safe connection points cannot be positively identified. See Identify and install your hardware tracker for the complete compatibility guidance.
You need the GeoBeetle Wired, the supplied spanner, the Communication ID from the silver label and access to a Track My Ride top-level account with an available hardware licence. Remove jewellery and keep tools away from other metal. A tool that touches the positive terminal and vehicle metal at the same time can cause a dangerous short circuit. Use a qualified automotive installer if the battery is difficult to access, uses an unfamiliar terminal or you are not trained to work safely around vehicle batteries.
Steps
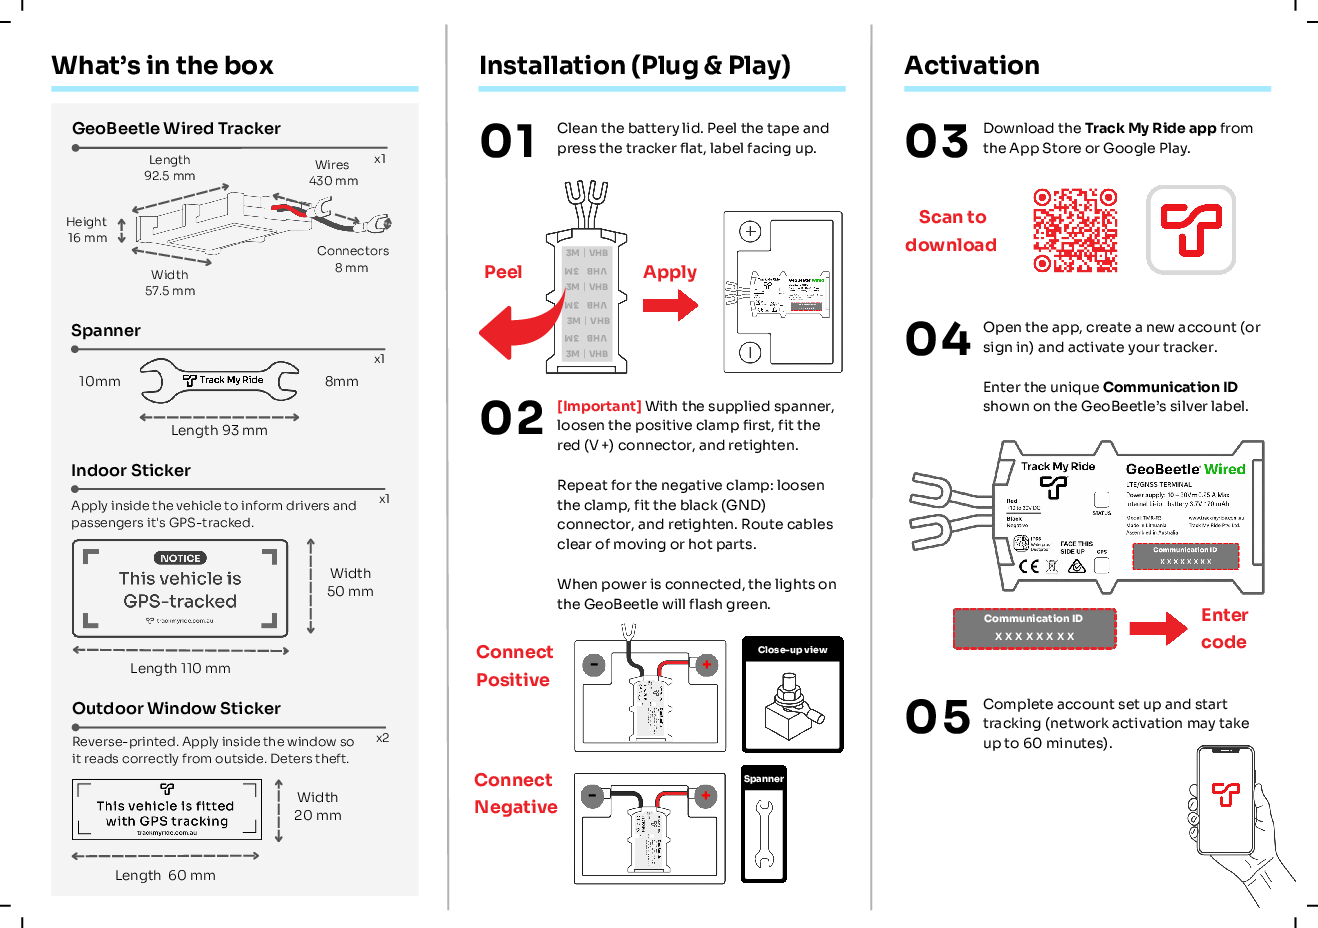
Mount and connect the tracker
- Turn the vehicle off and keep the keys away from the ignition.
- Choose a flat position on the battery lid where the tracker and its 430 mm leads can reach the terminals without stretching.
- Clean and dry the mounting area. Peel the backing from the adhesive pad and press the tracker flat onto the battery lid with the label and FACE THIS SIDE UP marking facing upwards.
- Keep the supplied spanner and all other tools from touching the positive battery terminal and any other metal at the same time.
- Loosen the positive clamp fastener, fit the red V+ ring terminal, and retighten the fastener securely.
- Loosen the negative clamp fastener, fit the black GND ring terminal, and retighten it securely.
- Route and secure both leads away from hot components, sharp edges and moving parts. Do not bend, crush, twist or place strain on the ring terminals.
- Confirm that the tracker lights flash green when power is connected.
Never reverse the red and black leads, short-circuit the terminals or connect the tracker to more than 30 V DC.
Activate and verify the tracker
- Download or open the Track My Ride app, then sign in or create the top-level account.
- Choose the tracker activation option and enter the Communication ID exactly as printed on the GeoBeetle Wired silver label.
- Complete account setup and follow the activation status shown in the application.
- Move the vehicle outdoors where it has mobile coverage and a clear view of the sky.
- Check the STATUS light. A one-second blink indicates normal operation, a two-second blink indicates sleep mode, and a short rapid flash indicates mobile-data activity.
- Check the GPS light. It remains on while acquiring a signal, blinks once per second after acquiring GPS, and turns off in sleep mode.
- Open Map and confirm that the correct vehicle shows a recent location.
- Before treating the installation as complete, drive approximately 1 km and confirm that the map shows the test route and current location. If it does not, verify coverage and move the tracker away from metal or foil-lined panels before testing again.
What happens next
The activated GeoBeetle Wired sends locations while it has vehicle power and network coverage. Its motion sensor allows it to reduce power use while the vehicle is stationary.
Follow the environmental limits in the supplied quick-start guide. Do not submerge or pressure wash the enclosure. Inspect the leads and terminals for wear, looseness or corrosion during each vehicle service.
Troubleshooting
- No lights appear after connection: Check that red is connected to positive and black to negative. Ask a qualified installer to verify battery voltage and both connections before changing them.
- The GPS light stays on: Confirm that FACE THIS SIDE UP faces upwards and move the vehicle away from thick metal, carbon fibre or foil-lined cover panels.
- The tracker has lights but no map location: Confirm the Communication ID and activation status, move the vehicle where it has a clear view of the sky and mobile coverage, then refresh Map.
- The tracker moves or a lead is under strain: Disconnect it safely and remount it. Do not rely on adhesive applied to a dirty, wet or uneven surface.
- The housing, lead or ring terminal is damaged: Stop using the tracker and contact Track My Ride Support or a qualified installer. Do not open or modify the enclosure.
Continue setup
After the installation checks pass, continue to Start using your new GPS tracker and complete the first-drive check. Return to Identify and install your hardware tracker if the model or fixed leads do not match this guide.