
Use this guide as the starting point for a new GeoBeetle Pro (TMR-S8) or GeoBeetle Wired (TMR-R3). It takes you from account activation and safe installation through to checking Alex's Car on the map, replaying a drive and creating a useful alert.
Before you start
Before activating tracking that may record another person's location, read Use GPS tracking responsibly. Tell affected people what will be tracked and complete the appropriate notice, permission and consent steps before continuing.
Have the tracker, its supplied cable or wiring harness, and the Communication ID printed on its silver label. You also need an email address you can access, the vehicle keys and a phone or computer with internet access.
Read the model-specific installation instructions before connecting power. Use a qualified automotive installer for permanent wiring, battery connections you are not trained to make or wired accessories. Keep the tracker and cables clear of pedals, steering, airbags, heat and moving parts.
Steps
1. Create your account and activate the tracker
Open Create a Track My Ride account and follow the registration steps. Enter a recognisable vehicle name and the Communication ID when prompted. If your account is already active and the tracker appears under Vehicles, continue to installation.
2. Identify and install your model
Open Identify and install your hardware tracker and match the model code on the silver label:
- Choose GeoBeetle Pro (TMR-S8) for the rectangular tracker with a detachable cable socket.
- Choose GeoBeetle Wired (TMR-R3) for the slim tracker with fixed red and black power leads.
Follow the complete model guide. Do not choose an installation method from the tracker's shape or wire colours alone.
3. Complete the first-drive check
- Move the vehicle to a safe outdoor location with a clear view of the sky and mobile coverage.
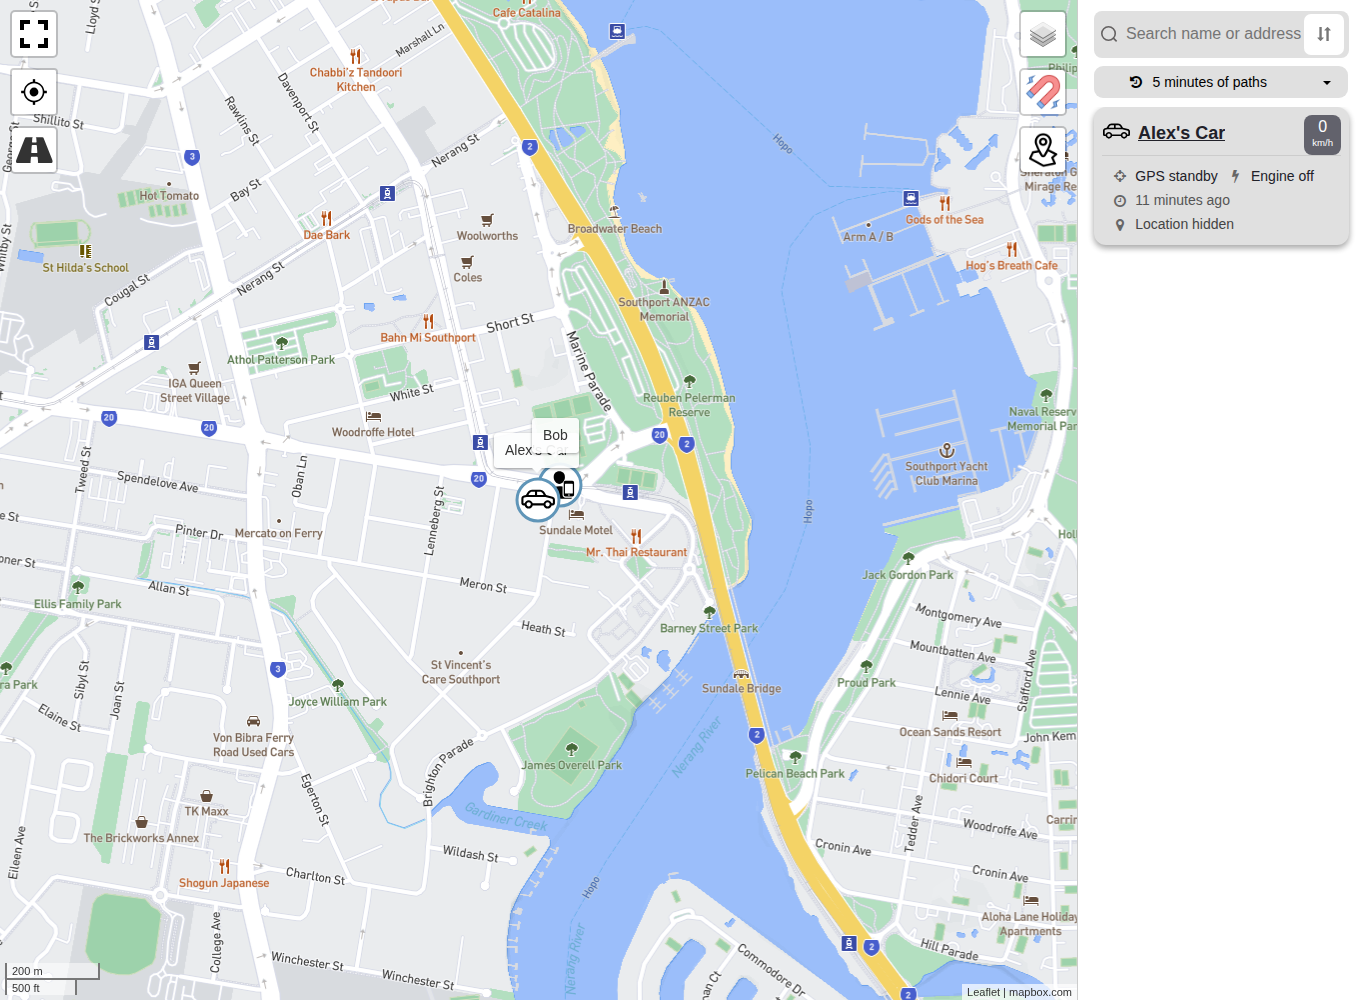
- Start the vehicle or wake the tracker while it is safely parked, then open Map and find Alex's Car.
- Read the displayed status together with Last update. Wait for a new update rather than relying only on a parked or stopped label.
- Select the vehicle card and check that its position is reasonably close to the vehicle. The resolved address can refer to a nearby road or property.
- Drive approximately 1 km on public roads while following all road rules. Include a turn where practical so the route is easy to recognise. Have another person check Track My Ride if using a phone or computer would distract the driver.
- Park safely, refresh Map and confirm that the last-update time advances.
- Select 5 minutes of paths or another recent period and check that the route appears.
- Select the vehicle card, open History and replay the test period. The marker, timestamp and timeline should move through recorded GPS updates.
4. Learn the live map and playback
Open View vehicle locations and replay a journey. Check the last-update time with the displayed status, then replay the test drive. Playback animates recorded GPS updates; it is not a continuous live video of the vehicle.
5. Create your first zone and alert
Open Create your first zone and alert. Draw a practical zone around a depot, office or regular parking place, then create a zone-entry or zone-exit alert for one vehicle.
6. Secure your account
Open Update your profile, password and sessions. Use a unique password, enable two-factor authentication and review active sessions and phone notification registrations.
What happens next
Your tracker reports when it has power, mobile coverage and sufficient Global Positioning System (GPS) reception. The map shows the latest received position, while playback and alerts depend on GPS updates recorded and uploaded by the tracker.
After completing this path, explore reports when you need journey distances, operating time or exports. Keep the Communication ID and installation details with the vehicle's service records.
If you are preparing a business account for multiple vehicles or users, continue to Set up Track My Ride for your team before adding the rest of the organisation.
Troubleshooting
- The Communication ID is rejected: Compare every character with the silver label and confirm that the tracker is not assigned to another account.
- The tracker does not appear on Map: Confirm activation and power, move the vehicle outdoors and allow time for its first mobile and GPS connection.
- The displayed position is old: Read the status together with the last-update time. A parked, sleeping or offline tracker can remain at its last reported location.
- The latest position appears but the route is missing: Widen the path or playback period and allow delayed records to upload.
- The location is far from the vehicle: Wait for another outdoor update and confirm that the tracker is mounted as described in its model-specific installation guide.
- The route or alert is missing: Confirm the test period, vehicle, zone and alert schedule. Delayed uploads can make a route or event appear later.
- You cannot complete a wiring check safely: Stop and ask a qualified automotive installer or Track My Ride Support for help.